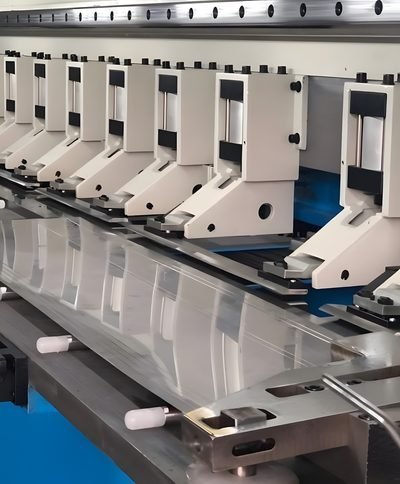
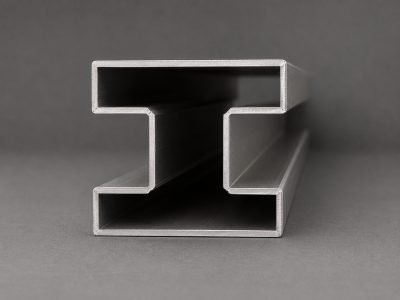
CNC V-grooving channel milled into stainless steel sheet before bending

The difference is in the edge

Laser → V-groove → bend → weld → finish → inspect. One chain, one workshop, your drawing.

V-grooving vs normal bending

Design samples · profiles, panels, louvers

Ready designs,
drawn in 2D and 3D

Each sample is a real design from our builders: the 2D drawing, a 3D view, the section sizes, where it is used and how it goes up on site. Open one in the builder to change any size, or add it to your BOQ as it is.

Why every sample is V-grooved

An ordinary press brake wraps the sheet round its tool, so the outside corner comes out round. We first cut a V along each bend line, leaving a thin web of metal, then fold: the sheet closes into the V and the corner comes out sharp. Each sample below shows where its V-cuts go.

Every sample has a sample ID to quote, a free PDF datasheet (no registration) and its CAD file on WhatsApp.

V-grooving vs normal bending
Ordinary bendoutside corner comes out round1 · V-cut firsta thin web is left2 · then foldedthe corner is sharp

Make it yours in the BOQ builder

Every sample opens in our free builder: change any size, angle, metal or finish, add your own items and download one BOQ with a drawing of each.

  • Your sizes · any sample changed to your drawing
  • One BOQ · all items, drawings and quantities in one PDF
  • Register free · keep your BOQs, get the file password and ask MCS for prices
  • Custom designs · our design team develops your own section, panel or louver with you

Profiles All profiles

CAD files of the profiles on WhatsApp
MCS-DS-PR-01Architect favourite

Flush shadow-gap reveal

A hat section set flush between wall boards: a crisp 10 mm shadow line instead of a filled joint.

Finish side1512101215FINISH SIDEB1 L 90°B2 R 90°B3 R 90°B4 L 90°
2D · section with sizes
Drawing the 3D view…
3D · the part
V top 90°V back 90°V back 90°V top 90°0.8 mm sheet · 4 V-cuts before folding · not to scale
V-groove detail · every bend of the section: each bend line is V-cut first, then folded, so the corner closes sharp
Section (outside sizes)
15 · 12 · 10 · 12 · 15 mm
Bends
L90° · R90° · R90° · L90° · V-grooved, sharp
Sheet
0.8 mm Stainless steel 304
Finish
Hairline
Length
2,400 mm, or to size

What makes it different. All four bends are V-grooved, so the shadow line has sharp, straight edges along its whole length.

Where it is used

  • Joints between wall panels or boards
  • Shadow lines in lobbies, lifts and reception walls
  • Ceiling-to-wall junctions

How it goes up

  1. Fix the two flanges to the substrate with screws or adhesive before the boards go up.
  2. Butt the boards against the reveal; the flanges sit behind them, so no fixing shows.
  3. Join lengths end to end with a short sleeve of the same section.
MCS-DS-PR-02

Sharp stair nosing with return

An L nosing with a small return under the step edge: a square, sharp step line that protects the tread edge.

Finish side45256FINISH SIDEB1 L 90°B2 L 90°
2D · section with sizes
Drawing the 3D view…
3D · the part
V top 90°V top 90°1.2 mm sheet · 2 V-cuts before folding · not to scale
V-groove detail · every bend of the section: each bend line is V-cut first, then folded, so the corner closes sharp
Section (outside sizes)
45 · 25 · 6 mm
Bends
L90° · L90° · V-grooved, sharp
Sheet
1.2 mm Stainless steel 304
Finish
Hairline
Length
2,400 mm, or to size

What makes it different. V-grooved before folding, so the visible step corner is a sharp 90° instead of a rounded press-brake bend.

Where it is used

  • Stone, tile and wood stairs
  • Stage and platform edges
  • Step edges in retail and hospitality

How it goes up

  1. Bed the tread leg on the step edge in construction adhesive.
  2. Add countersunk screws through the tread leg where the tread allows.
  3. Cut lengths to the tread width; ends can be closed with a welded or folded end cap.
MCS-DS-PR-03

Floor transition step (Z)

A Z section that bridges two floor finishes of different heights with one clean metal line.

Finish side251030FINISH SIDEB1 L 90°B2 R 90°
2D · section with sizes
Drawing the 3D view…
3D · the part
V top 90°V back 90°1.5 mm sheet · 2 V-cuts before folding · not to scale
V-groove detail · every bend of the section: each bend line is V-cut first, then folded, so the corner closes sharp
Section (outside sizes)
25 · 10 · 30 mm
Bends
L90° · R90° · V-grooved, sharp
Sheet
1.5 mm Stainless steel 304
Finish
Matte
Length
2,400 mm, or to size

What makes it different. The step height is set by the middle leg, so one section suits stone-to-wood or tile-to-carpet changes.

Where it is used

  • Stone to wood or tile to carpet changes
  • Door thresholds
  • Edges of raised floor areas

How it goes up

  1. Bed the lower leg under the lower floor finish in its adhesive or screed.
  2. The upper leg laps onto the higher floor; bond it with adhesive.
  3. Lay the finishes up to the profile; nothing needs to be cut on site afterwards.
MCS-DS-PR-04

Ceiling shadow-gap edge (F)

An F section that ends a gypsum ceiling 12 mm clear of the wall: the ceiling seems to float.

Finish side30122012FINISH SIDEB1 L 90°B2 R 90°B3 L 90°
2D · section with sizes
Drawing the 3D view…
3D · the part
V top 90°V back 90°V top 90°0.8 mm sheet · 3 V-cuts before folding · not to scale
V-groove detail · every bend of the section: each bend line is V-cut first, then folded, so the corner closes sharp
Section (outside sizes)
30 · 12 · 20 · 12 mm
Bends
L90° · R90° · L90° · V-grooved, sharp
Sheet
0.8 mm Stainless steel 304
Finish
Matte
Length
2,400 mm, or to size

What makes it different. The open shadow channel and the board seat are folded from one strip, so the line stays straight over long walls.

Where it is used

  • Gypsum and board ceilings meeting walls
  • Bulkhead edges
  • Hotel rooms, offices and showrooms

How it goes up

  1. Screw the back leg to the wall at the ceiling level.
  2. Rest the ceiling board on the lower ledge and fix it to the grid as usual.
  3. Mitre the corners; the joints sit in the shadow and are hard to see.
MCS-DS-PR-05Rare

Faceted corner guard (135° facets)

A corner guard with a facet turned 45° (135° inside) at each edge: it reads as a cut-glass corner, not a plain angle.

Finish side10353510FINISH SIDEB1 L 135°B2 L 90°B3 L 135°
2D · section with sizes
Drawing the 3D view…
3D · the part
V top 135°V top 90°V top 135°1 mm sheet · 3 V-cuts before folding · not to scale
V-groove detail · every bend of the section: each bend line is V-cut first, then folded, so the corner closes sharp
Section (outside sizes)
10 · 35 · 35 · 10 mm
Bends
L135° · L90° · L135° · V-grooved, sharp
Sheet
1 mm Stainless steel 304
Finish
Champagne Gold PVD on hairline
Length
2,400 mm, or to size

What makes it different. Three bends on one strip, 135°, 90° and 135°, each V-grooved, so every facet line is sharp.

Where it is used

  • Wall corners in corridors, lobbies and lifts
  • Column edges
  • Display and shop-fit corners

How it goes up

  1. Clean the wall corner and run two lines of adhesive tape or silicone.
  2. Press the guard onto the corner and hold it with tape while the adhesive sets.
  3. Cut to the wall height; the top end can be mitred or left square.
MCS-DS-PR-06

Sharp-cornered glass channel

A deep U channel that holds a glass panel at floor or ceiling, with sharp outside corners where the channel shows.

Finish side402240FINISH SIDEB1 L 90°B2 L 90°
2D · section with sizes
Drawing the 3D view…
3D · the part
V top 90°V top 90°1.5 mm sheet · 2 V-cuts before folding · not to scale
V-groove detail · every bend of the section: each bend line is V-cut first, then folded, so the corner closes sharp
Section (outside sizes)
40 · 22 · 40 mm
Bends
L90° · L90° · V-grooved, sharp
Sheet
1.5 mm Stainless steel 304
Finish
Hairline
Length
2,400 mm, or to size

What makes it different. The two outer corners are V-grooved, so the channel shows two crisp lines either side of the glass.

Where it is used

  • Frameless glass partitions
  • Glass screens in offices and shops
  • Shower and wet-area glass at the floor

How it goes up

  1. Screw the channel base to the floor or ceiling with countersunk screws before the glass arrives.
  2. Set the glass on setting blocks in the channel.
  3. Pack and seal the glass in the channel with the glazing wedges or silicone the glass supplier specifies.
MCS-DS-PR-07V-groove only

Stepped architrave, seven sharp steps

A door or wall architrave with seven sharp steps of 8 to 30 mm: a classic moulding drawn in crisp metal lines.

Finish side1081283081210FINISH SIDEB1 L 90°B2 R 90°B3 L 90°B4 R 90°B5 L 90°B6 R 90°B7 L 90°
2D · section with sizes
Drawing the 3D view…
3D · the part
V top 90°V back 90°V top 90°V back 90°V top 90°V back 90°V top 90°0.8 mm sheet · 7 V-cuts before folding · not to scale
V-groove detail · every bend of the section: each bend line is V-cut first, then folded, so the corner closes sharp
Section (outside sizes)
10 · 8 · 12 · 8 · 30 · 8 · 12 · 10 mm
Bends
L90° · R90° · L90° · R90° · L90° · R90° · L90° · V-grooved, sharp
Sheet
0.8 mm Stainless steel 304
Finish
Champagne Gold PVD on hairline
Length
2,400 mm, or to size

What makes it different. Seven bends, most only 8 to 12 mm apart: a press-brake tool cannot reach between them without crushing the last step, and each corner would come out round. V-cut first, every step folds sharp.

Where it is used

  • Door and opening architraves
  • Wall moulding and panel frames
  • Mirror and art frames

How it goes up

  1. Fix a timber or metal ground around the opening.
  2. Bond the architrave to the ground; pin through the back legs where they are hidden.
  3. Mitre the corners at 45° so the steps run round without a break.
MCS-DS-PR-08V-groove only

Folded box tube 25 × 25, four sharp corners

A square tube folded from one strip: four sharp outside corners and a hidden overlap, no weld on the faces.

Finish side2525252510FINISH SIDEB1 L 90°B2 L 90°B3 L 90°B4 L 90°
2D · section with sizes
Drawing the 3D view…
3D · the part
V top 90°V top 90°V top 90°V top 90°0.8 mm sheet · 4 V-cuts before folding · not to scale
V-groove detail · every bend of the section: each bend line is V-cut first, then folded, so the corner closes sharp
Section (outside sizes)
25 · 25 · 25 · 25 · 10 mm
Bends
L90° · L90° · L90° · L90° · V-grooved, sharp
Sheet
0.8 mm Stainless steel 304
Finish
Hairline
Length
2,400 mm, or to size

What makes it different. Closing a box means making the last bends inside a nearly finished tube, where a press-brake tool can hardly reach. With a V-cut at every corner line, the box closes with four sharp corners.

Where it is used

  • Slim frame members and screen grids
  • Furniture frames and legs
  • Decorative grids and dividers

How it goes up

  1. Cut to length and close the ends with end caps or a mitred joint.
  2. Fix with hidden screws or brackets inside the tube where it meets the structure.
  3. Join lengths with an internal sleeve.
MCS-DS-PR-09V-groove only

Sawtooth fin, 60° folds

A zig-zag strip with alternating folds closed to 60°: a sharp, faceted fin that catches light on every face.

Finish side202020202020FINISH SIDEB1 L 60°B2 R 60°B3 L 60°B4 R 60°B5 L 60°
2D · section with sizes
Drawing the 3D view…
3D · the part
V top 60°V back 60°V top 60°V back 60°V top 60°1 mm sheet · 5 V-cuts before folding · not to scale
V-groove detail · every bend of the section: each bend line is V-cut first, then folded, so the corner closes sharp
Section (outside sizes)
20 · 20 · 20 · 20 · 20 · 20 mm
Bends
L60° · R60° · L60° · R60° · L60° · V-grooved, sharp
Sheet
1 mm Stainless steel 304
Finish
Mirror
Length
2,400 mm, or to size

What makes it different. Alternating folds 20 mm apart, each closed to 60°: the V-cut on alternate faces lets every fold close with a sharp edge.

Where it is used

  • Feature fins and screens
  • Ceiling baffles with a faceted face
  • Signage and display edges

How it goes up

  1. Fix the end legs to brackets or a frame at each end.
  2. Add intermediate brackets on long spans so the folds stay true.
  3. Run fins at an even pitch for a regular faceted pattern.
MCS-DS-PR-10V-groove only

Deep narrow slot channel 8 × 40

A U channel only 8 mm wide inside and 40 mm deep: a slim reveal or a slot for a glass or panel edge.

Finish side409.640FINISH SIDEB1 L 90°B2 L 90°
2D · section with sizes
Drawing the 3D view…
3D · the part
V top 90°V top 90°0.8 mm sheet · 2 V-cuts before folding · not to scale
V-groove detail · every bend of the section: each bend line is V-cut first, then folded, so the corner closes sharp
Section (outside sizes)
40 · 9.6 · 40 mm
Bends
L90° · L90° · V-grooved, sharp
Sheet
0.8 mm Stainless steel 304
Finish
Hairline
Length
2,400 mm, or to size

What makes it different. A standard press-brake punch cannot reach into an 8 mm slot 40 mm deep. With V-cuts at both bend lines, the narrow base folds with sharp outside corners.

Where it is used

  • Slim reveals and recessed light slots
  • Edge channels for 6 mm glass or panels
  • Shadow slots in ceilings

How it goes up

  1. Fix the channel through the back of its legs before the boards go up.
  2. Set the panel or glass edge into the slot with the gasket or tape its supplier specifies.

  3. Join lengths end to end with a sleeve.

Panels All panels

CAD files of the panels on WhatsApp
MCS-DS-PN-01Solution

Hidden-fix façade cassette

A tray panel with a return and a lip on all four sides: a flat face with no screw in sight.

Bottom 2nd bend 90° inwardBottom 1st bend 90°Right 2nd bend 90° inwardRight 1st bend 90°Top 2nd bend 90° inwardTop 1st bend 90°Left 2nd bend 90° inwardLeft 1st bend 90°FACE 600 × 1200 (outside)Bottom: 30 + 15 inRight: 30 + 15 inTop: 30 + 15 inLeft: 30 + 15 inBend line (V-grooved)
2D · flat pattern with the bend lines
Drawing the 3D view…
3D · the part
V top 90°V top 90°1.2 mm sheet · 2 V-cuts before folding · not to scale
V-groove detail · one edge: lip, return and face: each bend line is V-cut first, then folded, so the corner closes sharp
Panel face
600 × 1,200 mm
Edges
30 mm return + 15 mm lip, turned in, all four sides, V-grooved, sharp
Perforation
none
Sheet
1.2 mm Aluminium
Finish
Mill (as supplied)

What makes it different. The four lips meet in mitred corners (cut on the diagonal), so the corners are closed and neat from behind too.

Where it is used

  • Façade and soffit cladding
  • Column and beam wraps
  • Feature walls in lobbies

How it goes up

  1. Fix a sub-frame of rails to the wall.
  2. Fix each cassette to the rails through its returns or lips, so the face stays clean.
  3. Leave the same open joint all round; it becomes the pattern of the façade.
MCS-DS-PN-02Rare

Gradient-perforated cassette

Round holes that grow from small at the bottom to large at the top: the panel fades from solid to open.

Bottom 2nd bend 90° inwardBottom 1st bend 90°Right 2nd bend 90° inwardRight 1st bend 90°Top 2nd bend 90° inwardTop 1st bend 90°Left 2nd bend 90° inwardLeft 1st bend 90°FACE 600 × 1200 (outside)Bottom: 30 + 15 inRight: 30 + 15 inTop: 30 + 15 inLeft: 30 + 15 inBend line (V-grooved)
2D · flat pattern with the bend lines
Drawing the 3D view…
3D · the part
V top 90°V top 90°1.5 mm sheet · 2 V-cuts before folding · not to scale
V-groove detail · one edge: lip, return and face: each bend line is V-cut first, then folded, so the corner closes sharp
Panel face
600 × 1,200 mm
Edges
30 mm return + 15 mm lip, turned in, all four sides, V-grooved, sharp
Perforation
Round Ø12, gap 6 (pitch 18), staggered rows, 40 plain border, hole size 25 to 100 % bottom to top · 2,024 holes · 17 % open in the perforated area
Sheet
1.5 mm Aluminium
Finish
Mill (as supplied)

What makes it different. Each hole is laser cut at its own size, so the gradient is smooth; a plain border keeps the cassette stiff.

Where it is used

  • Screens in front of services or windows
  • Façade bands and parking fronts
  • Lit feature walls

How it goes up

  1. Fix like the façade cassette: a rail sub-frame, fixings through the returns.
  2. Fit lighting or a backing behind if the gradient is to glow or be read against a colour.
  3. Hang panels in the order shown on the layout drawing so the gradient runs on.
MCS-DS-PN-03

Lift-wall panel with shadow joint

A shallow tray panel in champagne PVD: set side by side, the returns leave a fine shadow joint.

Bottom 2nd bend 90° inwardBottom 1st bend 90°Right 2nd bend 90° inwardRight 1st bend 90°Top 2nd bend 90° inwardTop 1st bend 90°Left 2nd bend 90° inwardLeft 1st bend 90°FACE 900 × 2100 (outside)Bottom: 20 + 10 inRight: 20 + 10 inTop: 20 + 10 inLeft: 20 + 10 inBend line (V-grooved)
2D · flat pattern with the bend lines
Drawing the 3D view…
3D · the part
V top 90°V top 90°1.2 mm sheet · 2 V-cuts before folding · not to scale
V-groove detail · one edge: lip, return and face: each bend line is V-cut first, then folded, so the corner closes sharp
Panel face
900 × 2,100 mm
Edges
20 mm return + 10 mm lip, turned in, all four sides, V-grooved, sharp
Perforation
none
Sheet
1.2 mm Stainless steel 304
Finish
Champagne Gold PVD on hairline

What makes it different. Shallow returns keep the panel light; the V-grooved edges stay sharp in a reflective PVD finish.

Where it is used

  • Lift car and lift lobby walls
  • Reception and counter fronts
  • Feature walls in hotels

How it goes up

  1. Bond the panels to the wall or lift-car board with structural adhesive tape.
  2. Use spacers in the joints while the adhesive sets, then remove them.
  3. Start from the centre line so the joints are even on both sides.
MCS-DS-PN-04

Hexagon-perforated ceiling tile

A 600 × 600 lay-in tile with hexagon perforation and a plain border.

Bottom 1st bend 90°Right 1st bend 90°Top 1st bend 90°Left 1st bend 90°FACE 600 × 600 (outside)Bottom: 20Right: 20Top: 20Left: 20Bend line (V-grooved)
2D · flat pattern with the bend lines
Drawing the 3D view…
3D · the part
V top 90°0.8 mm sheet · 1 V-cut before folding · not to scale
V-groove detail · one edge: return and face: each bend line is V-cut first, then folded, so the corner closes sharp
Panel face
600 × 600 mm
Edges
20 mm return, turned in, all four sides, V-grooved, sharp
Perforation
Hexagon 10 across flats, gap 3 (pitch 13), staggered rows, 25 plain border · 1,992 holes · 57 % open in the perforated area
Sheet
0.8 mm Aluminium
Finish
Mill (as supplied)

What makes it different. Hexagon holes give a higher open area than round holes at the same bar width, with an unusual look.

Where it is used

  • Ceilings in offices, retail and transit spaces
  • Service ceilings that must stay open to the air
  • Feature ceiling zones

How it goes up

  1. Lay the tiles into a standard 600 × 600 exposed T-grid.
  2. An acoustic fleece or a backing can be laid on top where the design needs it.
  3. Tiles lift out for access to the services above.
MCS-DS-PN-05

Sharp V-fluted wall cladding

Fine V flutes at 30 mm pitch across a 600 mm panel, in gold PVD: a ribbed wall with crisp shadow lines.

600 mm · 19 flutes10 deeppitch 30return 20
2D · section with sizes
Drawing the 3D view…
3D · the part
V top 90°V back 146°V top 113°V back 113°V top 113°V back 113°0.8 mm sheet · 6 V-cuts before folding · not to scale
V-groove detail · the return and the first flutes: each bend line is V-cut first, then folded, so the corner closes sharp
Panel
600 × 2,400 mm
Flutes
19 V flutes at 30 pitch, 10 deep, returns 20, every fold V-grooved
Sheet
0.8 mm Stainless steel 304
Finish
PVD Gold on hairline

What makes it different. Every flute is a V-grooved fold, so the ridges are sharp and the light catches each one.

Where it is used

  • Feature walls and reception backdrops
  • Column cladding
  • Bar fronts and counters

How it goes up

  1. Bond the panels to a plywood or board backing, or screw through the side returns into a frame.
  2. Butt the panels side by side; the returns line up the flutes.
  3. Finish the ends with a matching trim profile.
MCS-DS-PN-06Rare

Deep box-flute feature panel

Square flutes 20 mm wide, 20 mm deep and 20 mm apart, in bronze PVD: a bold, architectural rhythm.

450 mm · 11 flutes20 deeprib 20 + gap 20return 20
2D · section with sizes
Drawing the 3D view…
3D · the part
V top 90°V back 90°V top 90°V top 90°V back 90°V back 90°1 mm sheet · 6 V-cuts before folding · not to scale
V-groove detail · the return and the first flutes: each bend line is V-cut first, then folded, so the corner closes sharp
Panel
450 × 2,400 mm
Flutes
11 square flutes 20 wide, 20 apart, 20 deep, returns 20, every fold V-grooved
Sheet
1 mm Stainless steel 304
Finish
Bronze PVD on hairline

What makes it different. Deep square flutes with sharp outside corners are hard to fold on a normal press brake; V-grooving makes them crisp.

Where it is used

  • Statement walls in hotels and showrooms
  • Lift lobbies
  • Façade bands at ground level

How it goes up

  1. Screw through the side returns into a timber or steel frame.
  2. Join the next panel so the land widths match and the rhythm runs on.
  3. Close the top and bottom with a flat trim or leave a shadow gap.

Louvers All louvers

CAD files of the louvers on WhatsApp
MCS-DS-LV-01Solution

Z-blade privacy screen

Overlapping Z blades at 45° in a window opening: no straight-on view through, and the folded lips stiffen each blade.

2D · elevation and blade section
Drawing the 3D view…
3D · one blade
V top 90°V back 90°1.5 mm sheet · 2 V-cuts before folding · not to scale
V-groove detail · the blade: each bend line is V-cut first, then folded, so the corner closes sharp
Opening
2,400 × 1,500 mm, horizontal blades
Blade
Z blade 20 × 100 × 20, at 45°, V-grooved folds
Blades
18 at 83.5 mm pitch, 2,390 mm long
Supports
3 U channels 25 × 40 × 25
Sheet
1.5 mm Aluminium
Finish
Mill (as supplied)

What makes it different. The Z section is folded from flat sheet, so the blade length and lip sizes are free to suit the opening.

Where it is used

  • Window and balcony screens
  • Service yard and AC ledge screens
  • Stair-core openings

How it goes up

  1. Fix the U support channels to the wall or frame at the sides and between.
  2. Slide or set each blade into place and screw or rivet it to the channels.
  3. Work from the bottom up so each blade laps the one below.
MCS-DS-LV-02

Folded C-fin façade

Vertical C fins standing straight out from the façade at 300 mm centres.

2D · elevation and blade section
Drawing the 3D view…
3D · one blade
V top 90°V top 90°2 mm sheet · 2 V-cuts before folding · not to scale
V-groove detail · the blade: each bend line is V-cut first, then folded, so the corner closes sharp
Opening
3,000 × 3,000 mm, vertical blades
Blade
C blade 25 × 150 × 25, at 0°, V-grooved folds
Blades
10 at 300 mm pitch, 2,990 mm long
Supports
3 U channels 25 × 40 × 25
Sheet
2 mm Aluminium
Finish
Mill (as supplied)

What makes it different. The two lips turn a flat fin into a stiff C section, so a deep fin can be made from thinner sheet.

Where it is used

  • Façade fins and vertical sun breakers
  • Car-park fronts
  • Feature bands on towers

How it goes up

  1. Fix horizontal support channels to the façade structure at the spacing shown.
  2. Fix each fin to the channels through its back lip.
  3. Check the fins plumb as they go up; the even pitch is what makes the façade.
MCS-DS-LV-03Rare

Angled C-blade plant screen

C blades turned to 30°: a light, open screen for plant areas and rooftops.

2D · elevation and blade section
Drawing the 3D view…
3D · one blade
V top 90°V top 90°1.2 mm sheet · 2 V-cuts before folding · not to scale
V-groove detail · the blade: each bend line is V-cut first, then folded, so the corner closes sharp
Opening
3,000 × 2,400 mm, horizontal blades
Blade
C blade 15 × 80 × 15, at 30°, V-grooved folds
Blades
20 at 122.1 mm pitch, 2,990 mm long
Supports
4 U channels 25 × 40 × 25
Sheet
1.2 mm Aluminium
Finish
Mill (as supplied)

What makes it different. The blade angle and pitch are set together on the drawing, so the view through can be planned before cutting.

Where it is used

  • Rooftop plant and chiller screens
  • Generator (DG set) enclosures
  • Parking and service openings

How it goes up

  1. Fix the support channels to the frame.
  2. Fix each blade to the channels at the set angle with brackets or screws.
  3. Keep the blade ends clear of the frame by the clearance shown.
MCS-DS-LV-04

Sun-shade fins over a window

Level flat fins standing out over a window, laser cut from 3 mm sheet.

2D · elevation and blade section
Drawing the 3D view…
3D · one blade
Opening
2,800 × 1,200 mm, horizontal blades
Blade
Flat fin 200, at 0°, laser cut
Blades
5 at 250 mm pitch, 2,790 mm long
Supports
4 U channels 25 × 40 × 25
Sheet
3 mm Aluminium
Finish
Mill (as supplied)

What makes it different. Flat fins need no bending; they are cut to any outline on the fibre laser and can carry a pattern of holes.

Where it is used

  • Shading over windows and shopfronts
  • Canopy blades
  • Pergola tops

How it goes up

  1. Fix brackets or support channels to the wall above the window.
  2. Bolt or screw each fin to the supports.
  3. Check the fins level before tightening.

Start a project

Need a design
to your own size?

Open any sample in the builder, change the sizes, and add it to your BOQ. Or send your drawing and our design team does it with you.